Documentation
Download the app and get started
The Integrity App is available for iPhone, iPad and Android. You need it to connect to a realm or a service supported by Integrity, or to create your own realm and services.
Once downloaded, you will be invited to join as a new user. If you already have an account and you are trying to recover your password, please read the transfer your information guide (coming soon).
Create a PIN code that will be your secure key to confirm most of the transactions in the App, and choose if you want to enable biometry or not. We really recommend to do so, as PIN codes are useful, but quite insecure.
If you have been invited to join a realm or if you have already started creating one, this is the moment to get back to your mail invite, and click or scan the invitation link. For more information read the Join a realm guide (coming soon). That’s it, you are done!
You can also start filling your profile and discover the services made available by Integrity: verify your identity, create your own realm…
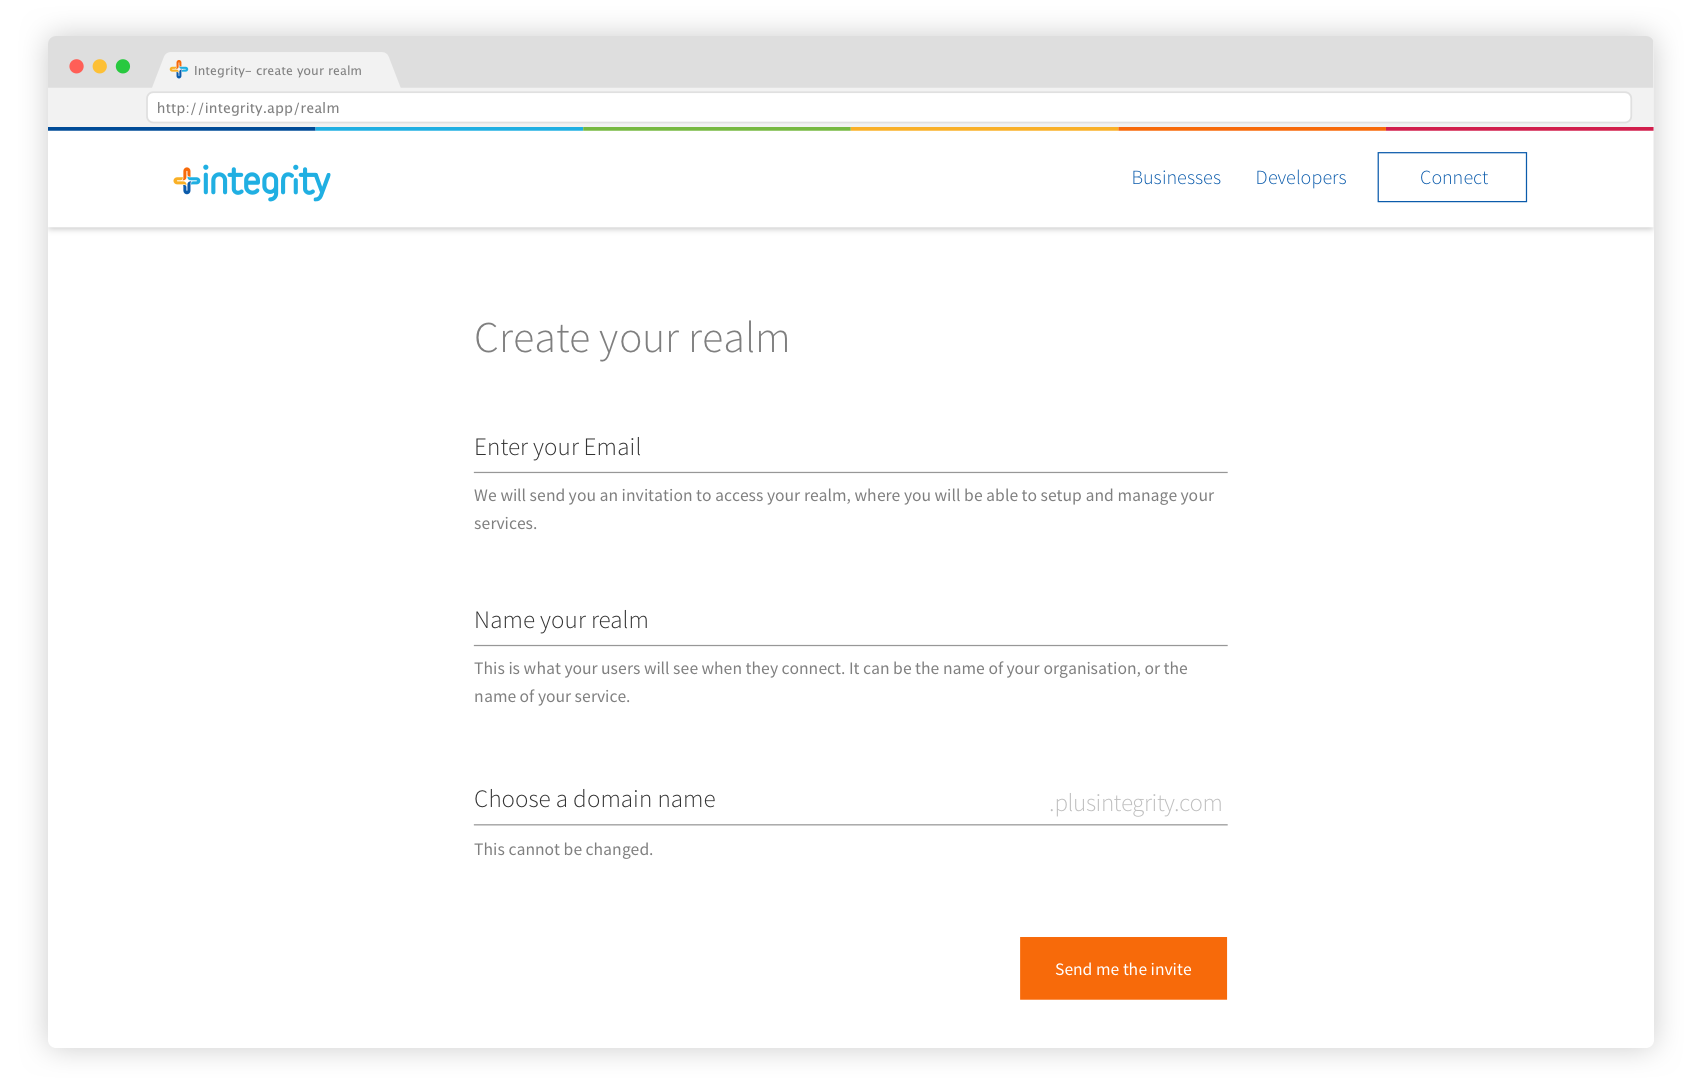
Create a realm
An Integrity realm is your digital kingdom: the central hub where you manage all your services and how people can access it.
It is very simple to create :
- Go to the realm creation form
- Enter your e-mail address.
- Choose a name for your realm.
- Choose a domain name for it (you don’t need to have your own domain name, by default your realm will be hosted by Integrity).
- And press “Send me the invite”.
Right after you filled the form, you will receive an email. Confirm your realm creation within 24 hours.
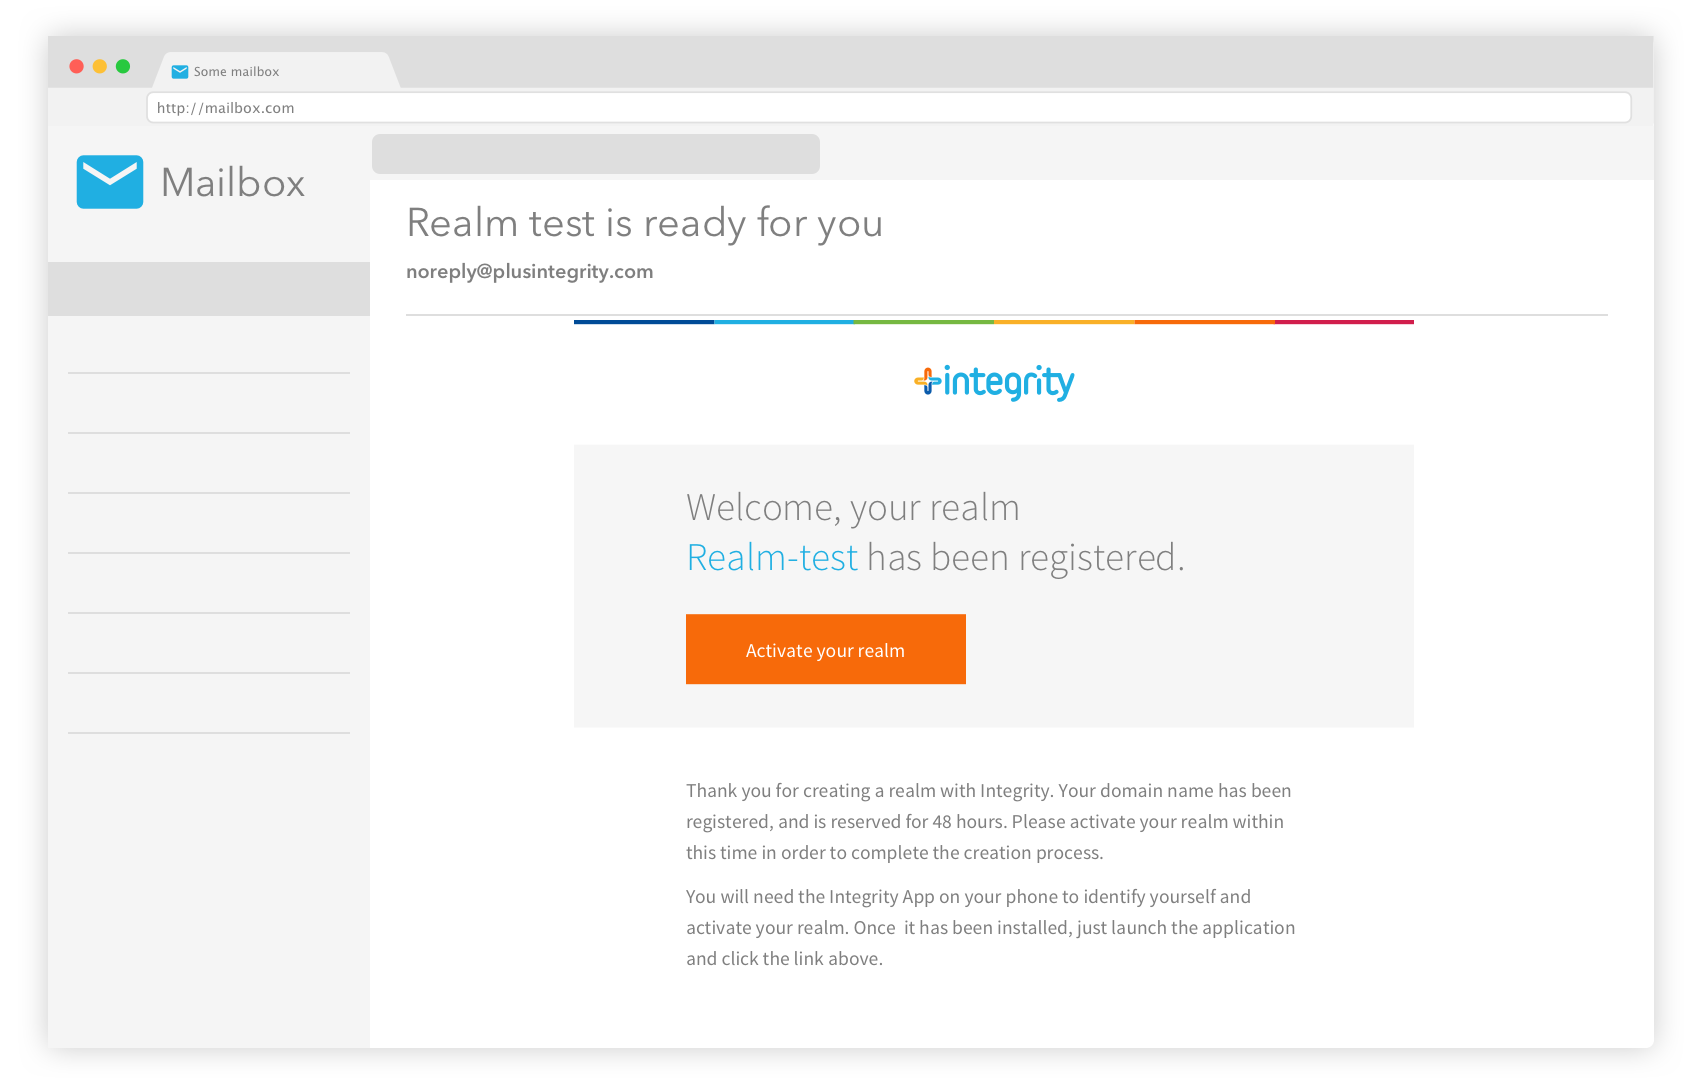
Three things happen then:
- Your domain name is reserved for 24h. If you don’t finish the creation process during this time, you will have to restart from the beginning.
- You receive an e-mail invite in your mailbox.
- You automatically get an admin mandate for your newly created realm, which means that you are now the king in your kingdom.
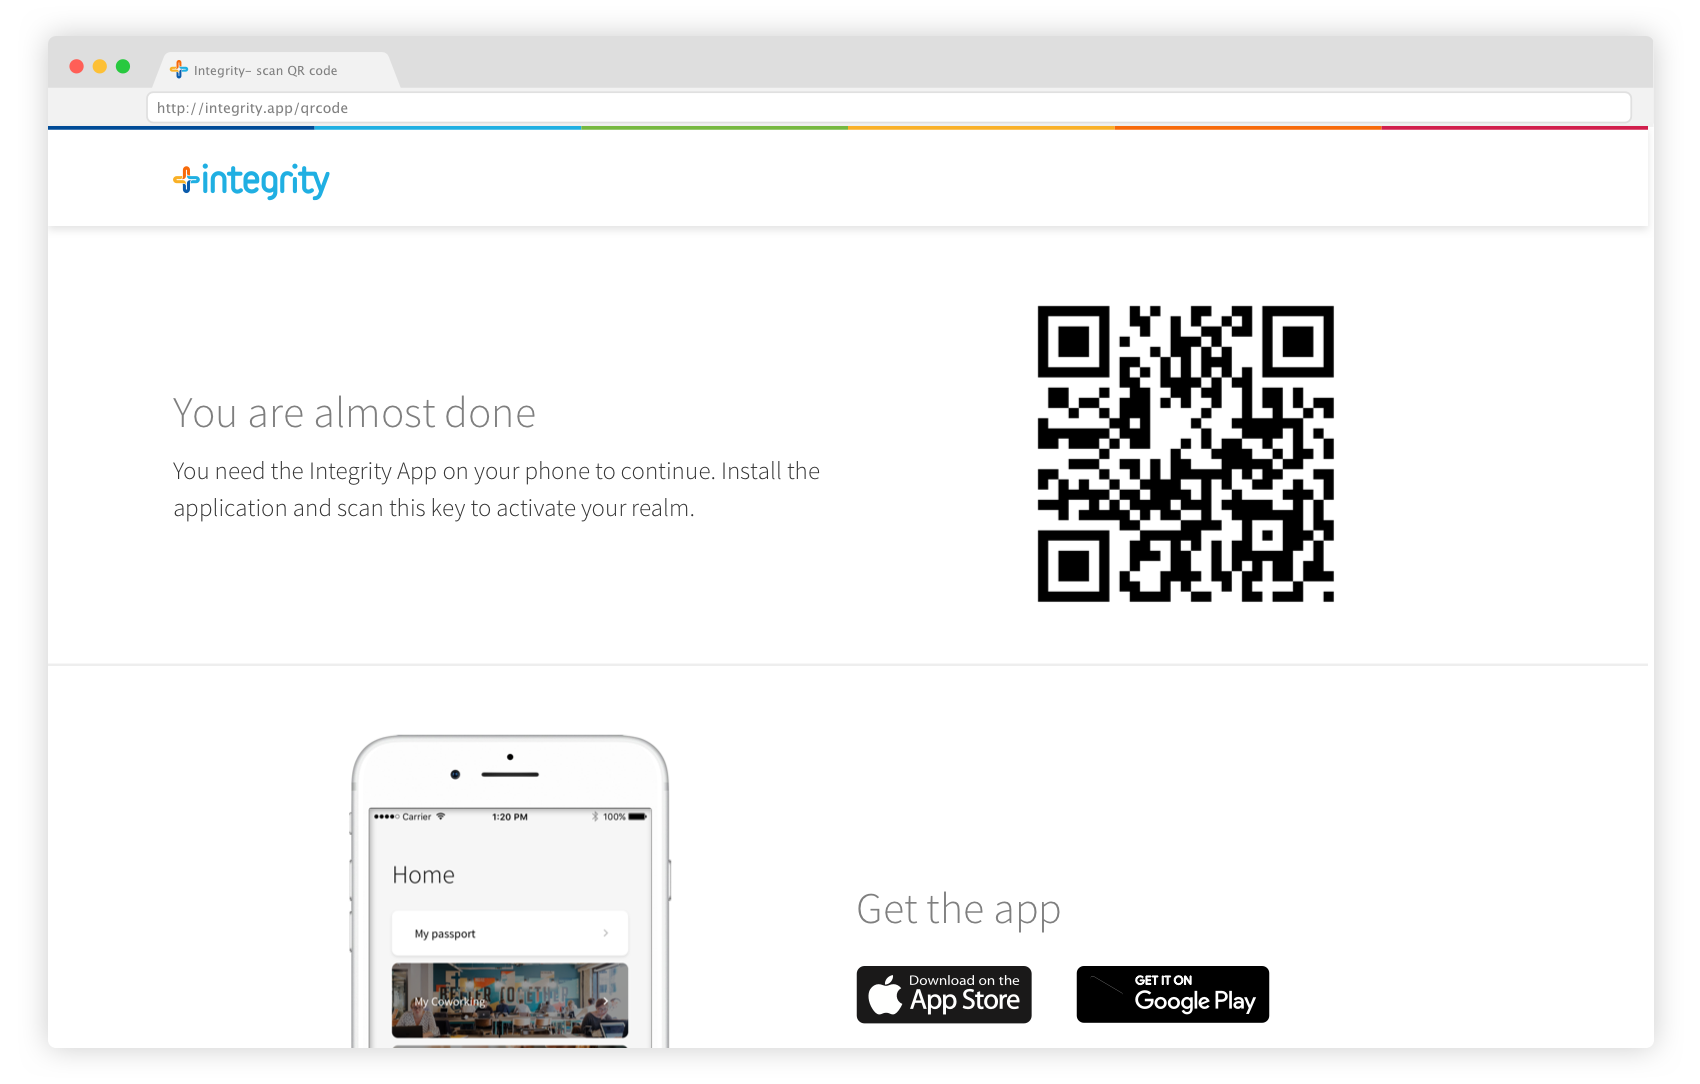
To confirm the realm creation, you need the Integrity App on your phone. If you don’t have it, you will find a link to install it in the email. If you have any question regarding how to get started with the app, please read our Download the app and get started guide.
Once installed, scan the QR code in the email (or click the link if you are on your phone) to receive your admin mandate and login to the realm admin interface.
Scan the confirmation screen with your Integrity application, confirm the creation of the realm on your phone, and get access to your realm admin.
You are all done! All you have left is to select which services you want to install in your realm, and start inviting people!
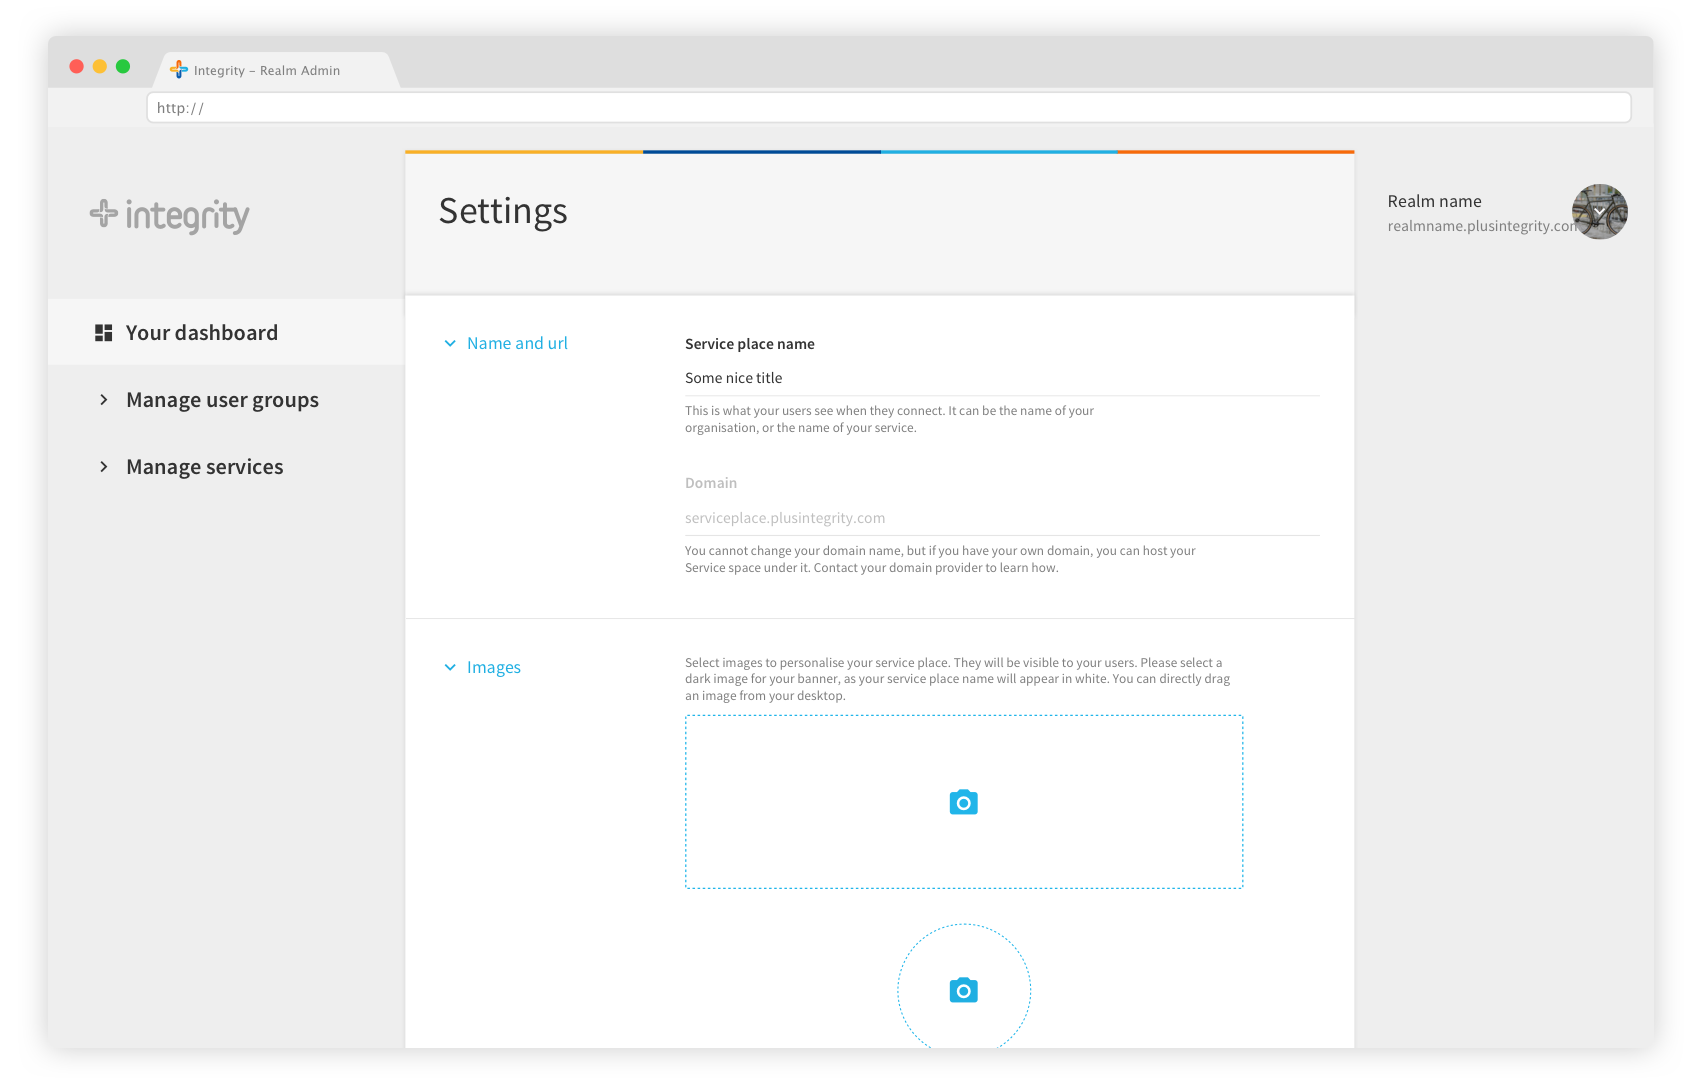
Overview of your realm admin
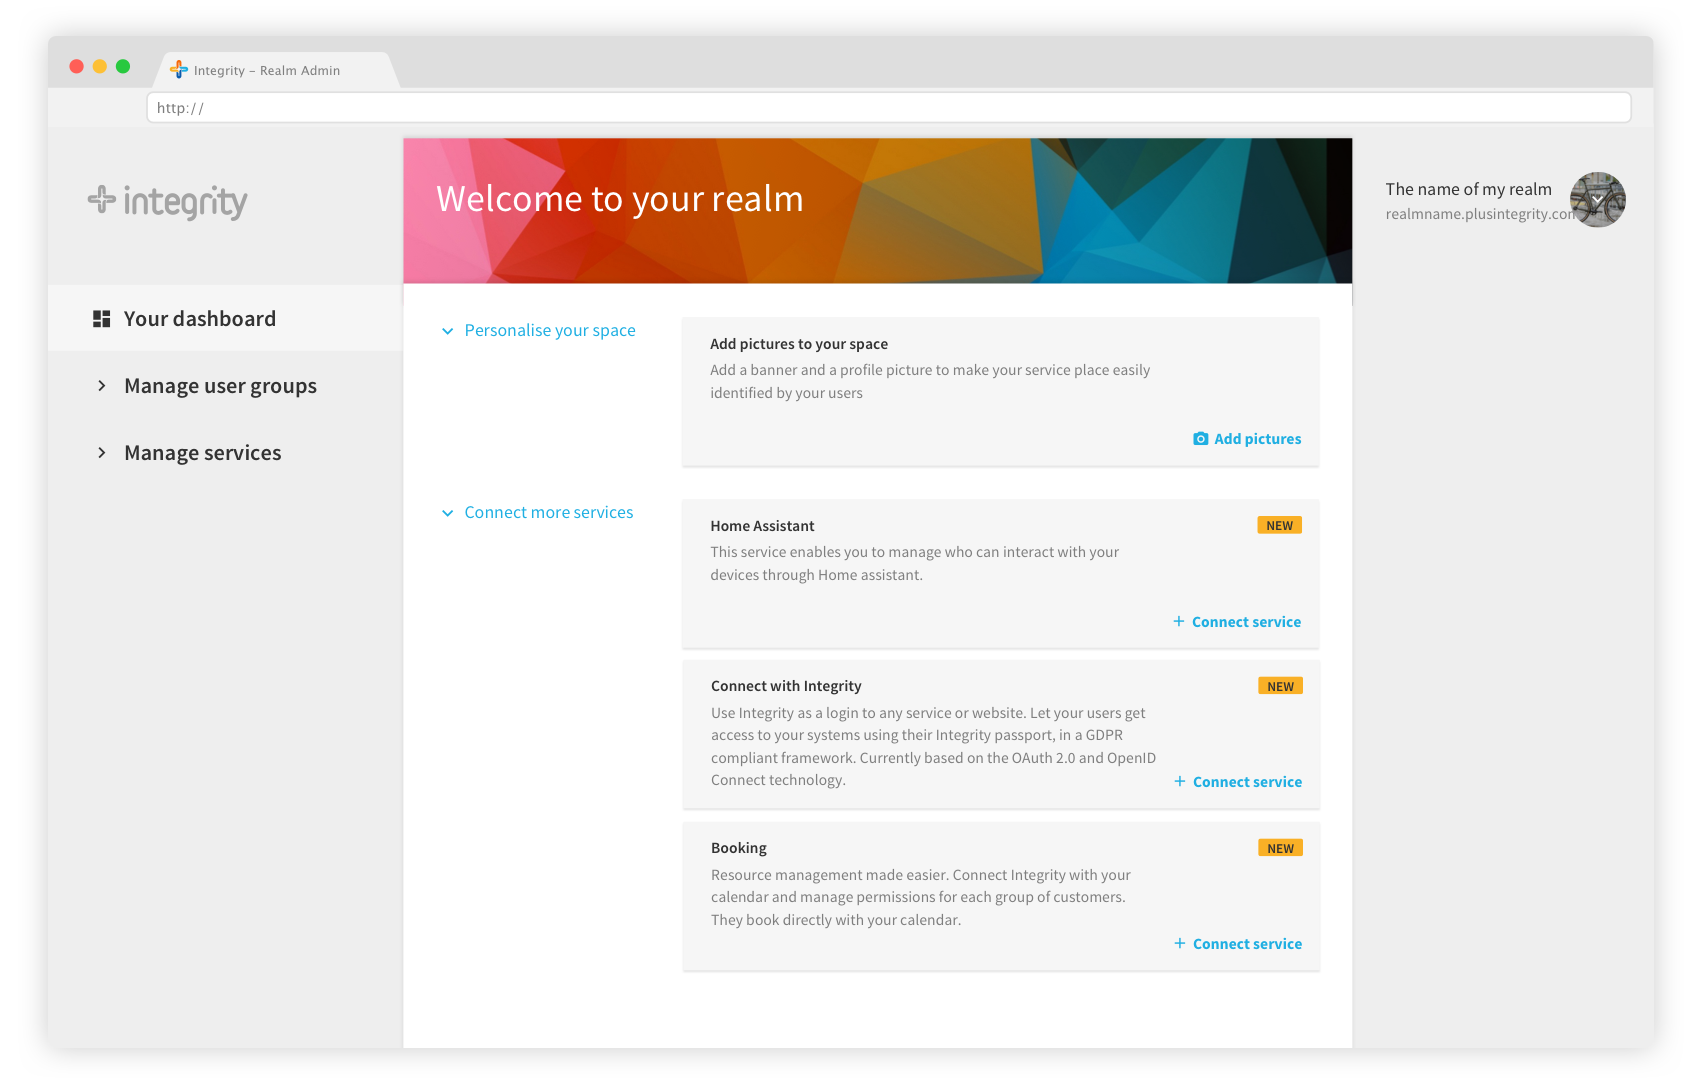
Welcome to your realm admin! Here you will connect services to your realm and manage access to it. The Integrity project is entirely open source, and developers are welcome to create their own services and offer them to realm owners. Join our dev community to discover more about it.
Your dashboard shows what you can do. This is where you will be invited to add new services as they are released, to invite more people, or to update your profile images.
When you add services to your realm, they will appear in the left bar of your screen under “Manage your services”. As you create groups for your users, they will appear in the left bar of your screen under “Manage your user groups”.
If you have created several realms, you can use the realm switcher to easily move from one realm admin to another without reconnecting. Just expand the switcher by clicking on your realm name, and select another realm, or click on “Login to another realm” to add it to the switcher.
Easily access your realm settings and switch to another realm with the switcher.

Invite people to your realm
Basic principles
The main purpose of a realm is to share access to services or resources. So, inviting people to your realm is a key step in the realm creation and management.
In Integrity, you invite people to join groups that share a specific access level. For example, as the creator of the realm, you are automatically a member of the Admin group, and have access to the realm admin. You can invite more people in the Admin group, and this will automatically give them access to the realm admin.
By default, when you create a realm, it automatically comes with two pre-defined user groups: Admins and Guests. As long as your realm is empty (you haven’t installed or shared any services), the guest users will not have access to any functionality. When you start adding services, you will be able to define their access very precisely for each service. Start adding the Home assistant service now!
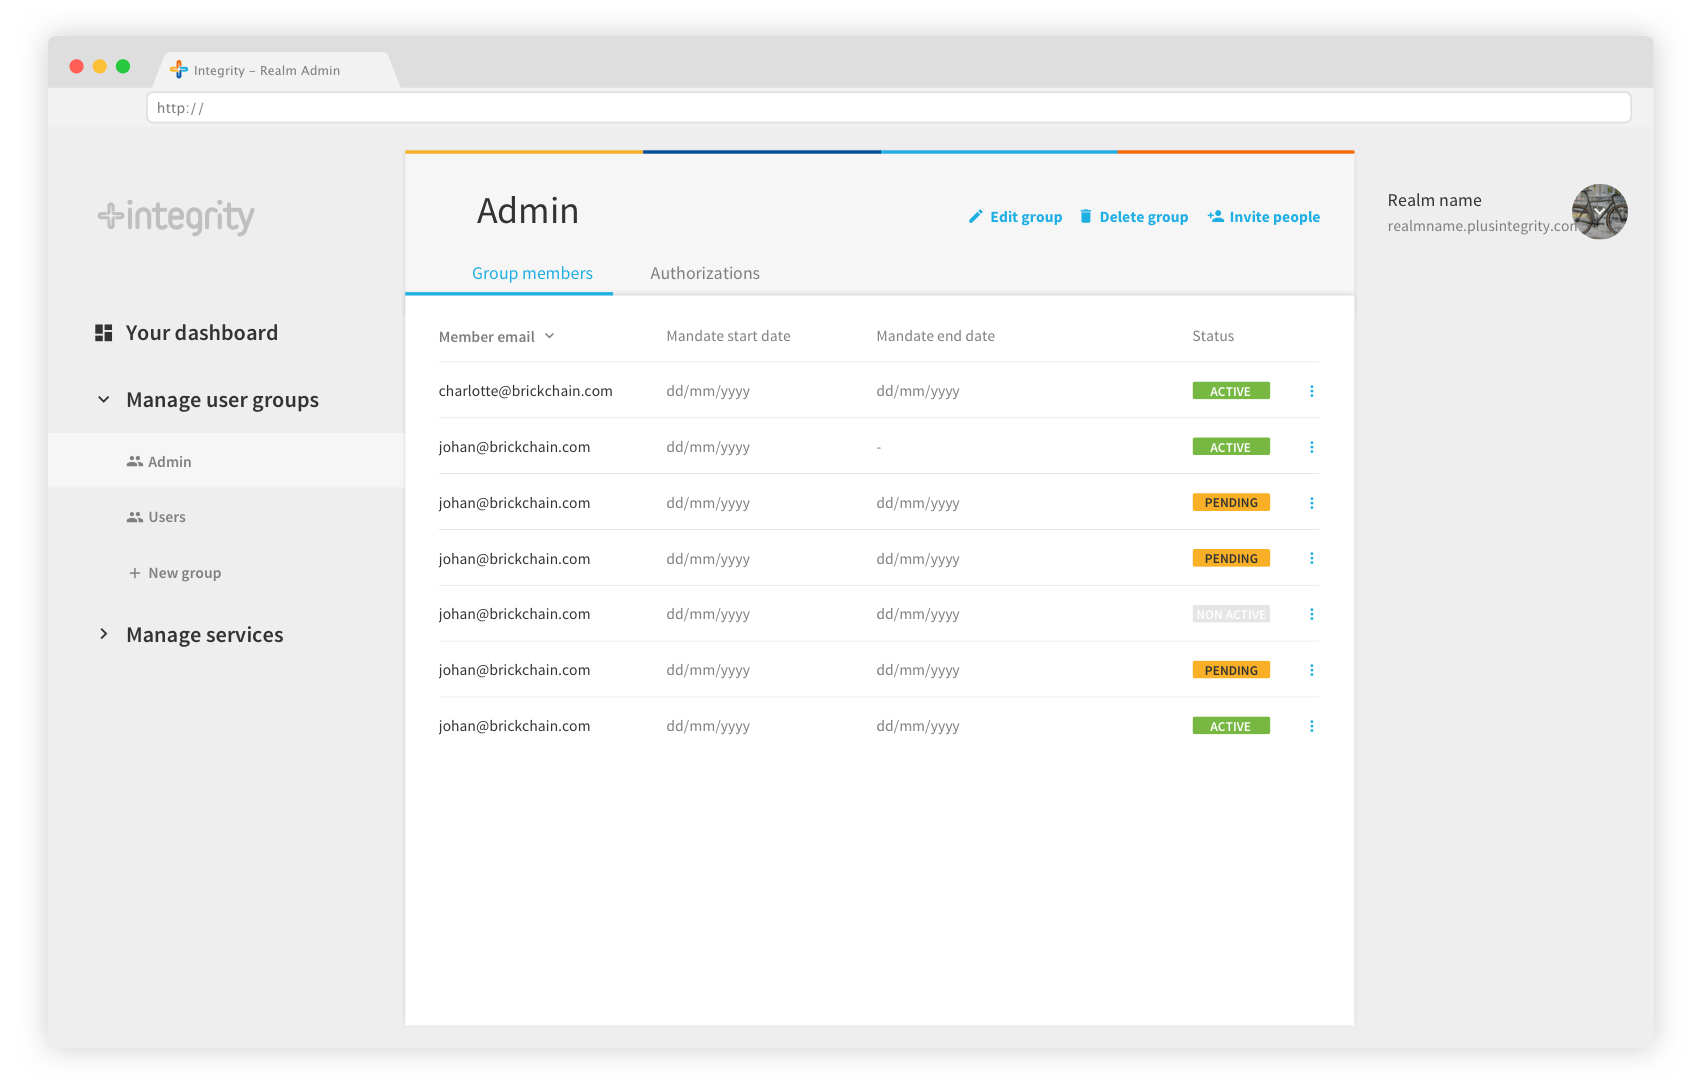
Group page
The group page is where you manage the members of a group. It can be accessed from the left navigation bar. It displays two tabs:
the Group member tab presents the list of members for that group and their status:
- Active means that the user has connected to your realm;
- Pending means that the user has received an invitation but has not connected to the realm.
- Non active means that the invitation of the user has expired, you need to re-invite this user if you want him to access your realm.
The Authorization tab presents an overview of access rights for the members of this group. Access rights are managed directly in the services, this page is just an overview.
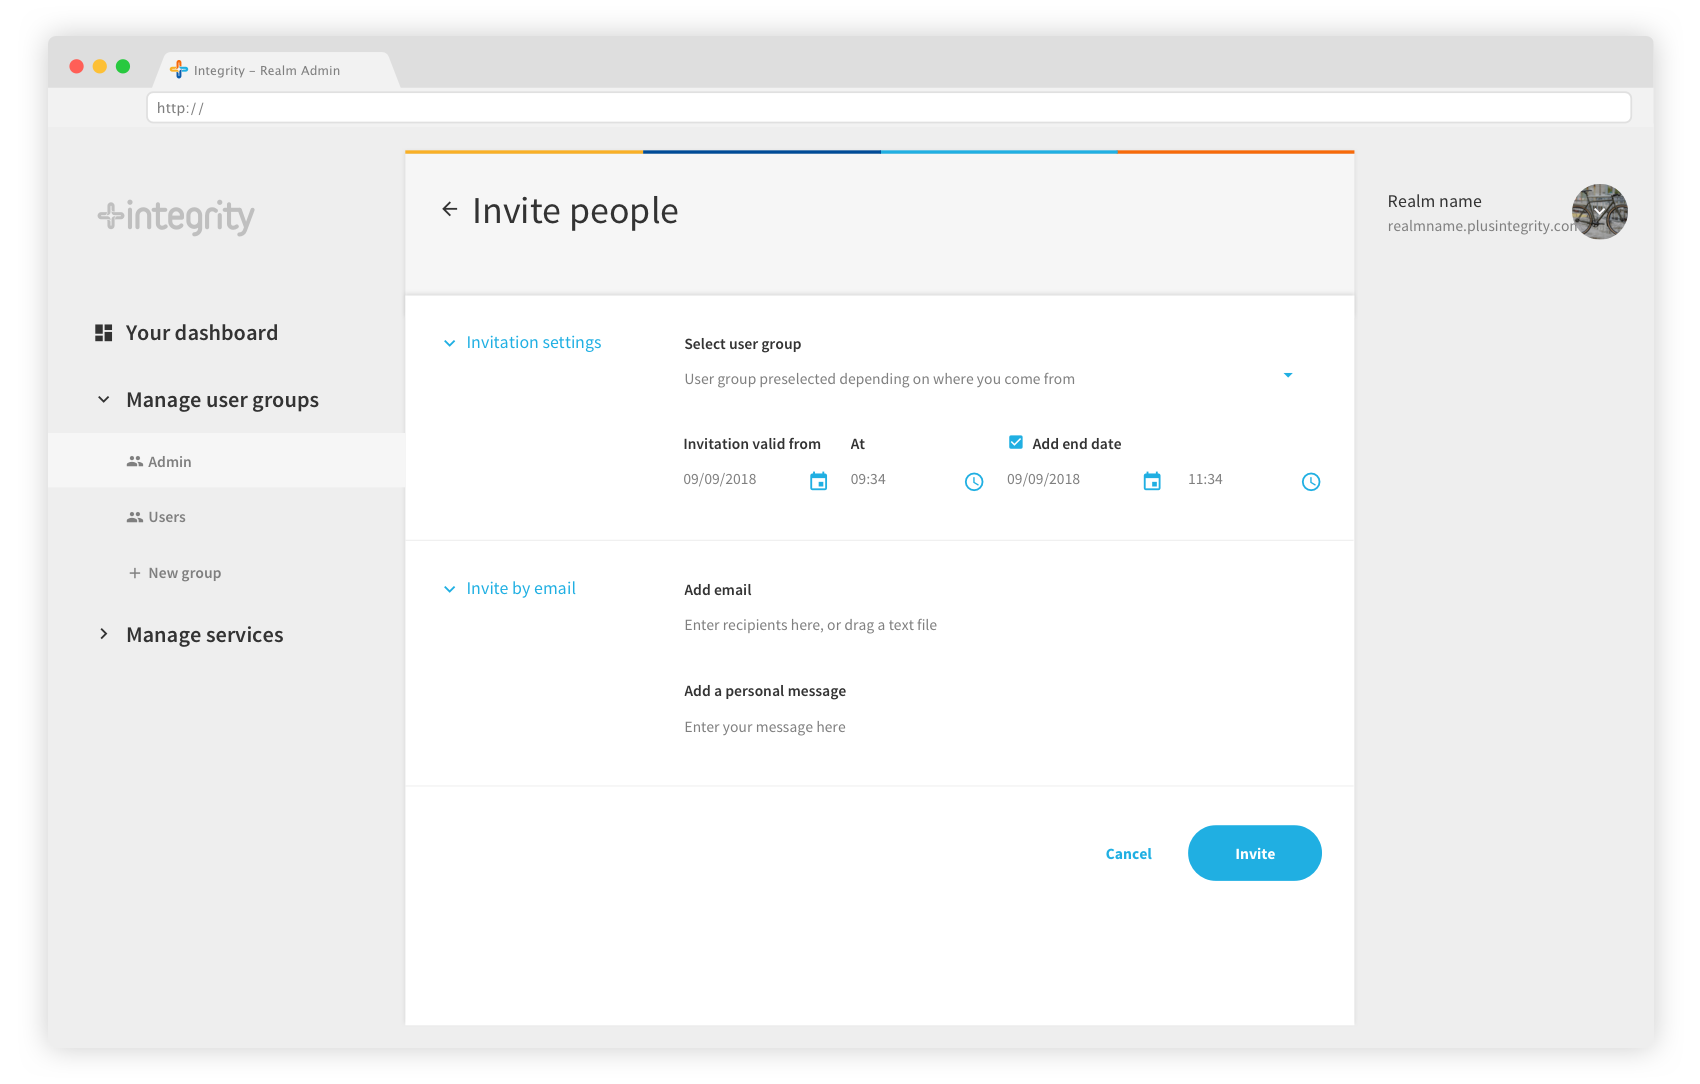
Invite people
Invitations to a realm are sent by email. You can invite people to a group directly from your dashboard, or from the group page. On the invitation page, select the group you want to invite to.
Select the validity of the invitation: by default, the invitation is valid from the moment you send it, without time limit. If for example you are inviting people to join your realm because you offer subscription-based services, or to give access to your home devices for home swapping, you can define a start date and an end date that match the terms of your contract. People will still receive the invitation, but their rights to access your services will only be valid during the period you defined.
Send email invites to one person or many people at once. Enter the email address of the person you’d like to invite, or drag a text file to add many at once, if you’d like.
Note: Let’s say you have two people you want to invite as guests. For one of them, you already know that you will share access temporarily, while for the other you don’t know yet. Just send two separate invitations to the same group. Invitations only affect people individually.
From the group page with the list of members in the group, invite more people to join.